


Installing a fence gate may seem like a straightforward task, but getting it right requires more than just a drill and a pair of hinges. Whether you're a homeowner looking to improve your backyard’s functionality or a contractor working on a residential fencing project, understanding the right steps and materials is essential for a long-lasting, smooth-operating fence gate.
In this detailed guide, we’ll walk you through the important things you need to know before installing a fence gate from choosing the right gate material to ensuring precise alignment and structural support. With thoughtful planning and proper installation, your gate won’t just function well; it’ll also enhance the overall aesthetics and security of your outdoor space.
Understanding the Purpose of Your Fence Gate
Before you pick up any tools, it’s important to understand what role your gate will play. Is it for decorative access to a garden, a security entrance for your backyard, or a functional driveway gate? The purpose will influence the size, material, hardware, and location of the gate.
For instance, a gate leading to a garden may be lightweight and decorative, whereas a gate for driveway access will need to be more robust, possibly a double gate with extra support. The frequency of use and the level of security needed will help you decide the specifications and design that fit your needs.
Choosing the Right Material
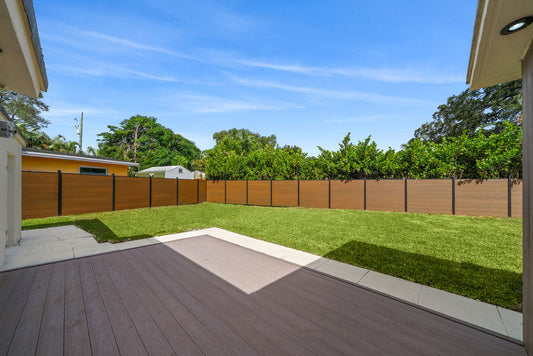
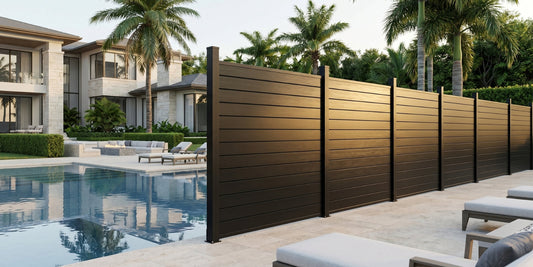
Fence gates are available in a variety of materials wood, metal, vinyl, and composite being the most common. Each material has its pros and cons, but in 2025, composite fence gates have emerged as the top choice for homeowners seeking a balance between aesthetics, durability, and low maintenance.
Composite fence gates, especially those offered by Wall Decor, are made from a mix of recycled wood fibers and plastic polymers. They are resistant to moisture, insects, and warping, and they maintain their look for years without the need for regular staining or painting. Unlike metal gates that may rust or wood gates that may rot, composite offers a clean, modern look with a significantly longer lifespan and fewer headaches.

Measuring the Opening
One of the most critical steps before installation is measuring the gate opening accurately. Measure the width between the two posts where the gate will hang, and ensure you factor in any hardware spacing, such as hinges or latches.
A common mistake is failing to leave enough clearance for the gate to swing open or close properly. You’ll want to leave a small gap usually ½ inch to 1 inch between the gate and the post to allow for movement due to temperature changes or soil settling. Also, take note of the ground slope, especially if installing near a slanted driveway or uneven lawn. This can affect how far the gate can swing and whether you’ll need to trim the bottom.
Selecting the Right Hardware
Not all hinges and latches are created equal. For a long-lasting installation, choose rust-resistant hardware such as galvanized steel, stainless steel, or powder-coated aluminum. Composite fence gates pair best with hardware specifically designed for their weight and density.
Make sure you have:
- Two or more heavy-duty hinges
- A latch or lockset
- Screws or bolts that are long enough to anchor deeply into the gate and post
- Optional: self-closing hinges or gate stops if needed
Proper hardware selection ensures smooth operation and long-term reliability, especially in areas exposed to wind or heavy use.
Preparing the Fence Posts
Your gate is only as strong as the posts that hold it. If you're attaching a gate to existing fence posts, inspect them for signs of wear, rot, or weakness. For new installations, ensure that the gate posts are made of sturdy material and are set deep in the ground with concrete footing.
Typically, posts should be set at least 2 to 3 feet deep, depending on your frost line and soil type. Use a level during installation to ensure the posts are plumb (vertically straight) crooked posts can result in a misaligned gate or hardware strain. Let the concrete cure fully (usually 24–48 hours) before attaching the gate.
Assembling the Gate (if not pre-made)
Some gates come pre-assembled, especially composite and vinyl models, but others require building on-site. If assembling yourself, use a strong frame either metal-reinforced or securely fastened wooden members and ensure it’s square.
Composite gate kits from Wall Decor come with easy-to-assemble panels and reinforced internal framing for stability. These kits reduce installation time and ensure the final gate won’t sag or warp over time. Double-check your measurements before tightening all components to prevent misalignment.
Attaching the Hinges
Once your gate and posts are ready, it’s time to attach the hinges. Start by positioning the gate within the opening to ensure spacing on all sides is even. Use wood or rubber shims under the gate to hold it at the right height off the ground while you mark and attach the hinges.
Secure the top hinge first and test for movement. Then attach the bottom hinge and open/close the gate to ensure it swings freely. If you’re installing a heavy gate, consider a third hinge in the middle for additional support. Don’t overtighten until you're confident the alignment is correct.
Installing the Latch and Lock
Once the gate swings properly, install the latch or locking mechanism. Choose the right height usually around 3–4 feet from the ground so it’s easily accessible. Ensure that the latch aligns perfectly with the gate frame and post, and test it several times before tightening the screws.
For added security, especially on backyard or driveway gates, consider installing a keyed lock or even a smart lock system compatible with your home’s security setup.

Final Adjustments and Testing
After all components are in place, give your new gate a full test. Swing it open and closed multiple times, ensuring it moves smoothly without dragging or binding. Check the alignment, hinge tension, and latch mechanism.
Walk around both sides to ensure the appearance is clean, symmetrical, and free from gaps or loose parts. If needed, make small adjustments with a screwdriver or drill to perfect the alignment.
Maintenance Tips for Longevity
One of the best things about using a composite fence gate from Wall Decor is that it requires minimal maintenance. However, a quick rinse with water every few months will help keep it clean and looking new.
Check your hinges and latch annually to ensure they’re still tight and rust-free. If you live in an area with high winds or storms, inspect the posts and gate alignment after major weather events to prevent long-term shifting or damage.
Why Choose Composite Fence Gates from Wall Decor?
Wall Decor’s composite fence gate systems are designed with DIY installation and long-term durability in mind. We offer a variety of gate styles, finishes, and sizes that match perfectly with our composite fencing panels and posts. Whether you’re upgrading your backyard, securing your garden, or adding elegance to your driveway, our composite gates provide unmatched style and performance.
In 2025, composite has become the go-to material for discerning homeowners who want the look of wood without the hassle. With its weatherproof surface, fade-resistant colors, and eco-friendly composition, composite fencing is a smart investment for any property.
Final Thoughts
Installing a fence gate doesn't have to be complicated but it does require proper planning, precise measurement, and the right materials. By understanding what to expect and following best practices from the beginning, you can install a functional, secure, and beautiful gate that will last for years.
Whether you're a DIY enthusiast or a professional installer, Wall Decor’s composite gate solutions offer everything you need to get started with easy-to-follow instructions, durable hardware, and stylish designs that elevate any outdoor space.
Ready to transform your fence with a reliable, low-maintenance gate? Explore Wall Decor’s full collection of composite fence gates and accessories today and take the first step toward a more secure and stylish property.
Tags:
Previous
L-Trims, Corner Trims & End Caps: What They Are and When to Use Them
Next
Waterproof PVC Marble Sheets: Durable & Elegant Wall Panels
Related articles


Jun 19 2026